

Game Plan and Crises
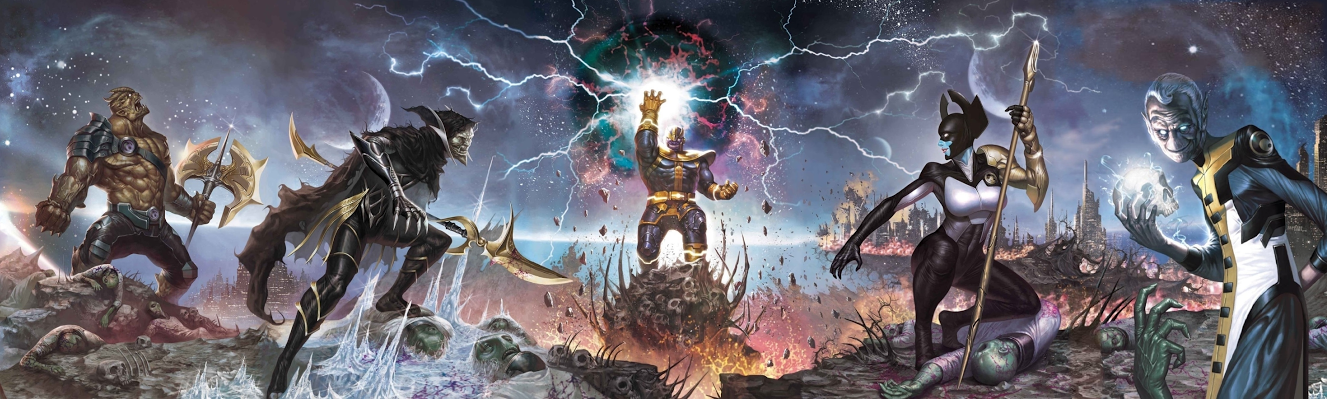
Coming to you in a joint effort of Ulysses, Fingerguns and UtilityCookie, we will try to shine a light on how to play the ultimate badasses of MCP, Black Order. If you like to win by absolutely dominating the opponent and showing them who’s boss, Black Order is the right affiliation for you. Black Order does not care how many points your opponents’ models cost or which models they are. Are you tired of facing Angela and her running away? Are you sick of Enchantress stealing your stuff? Do you just hate M.O.D.O.K? Come join the Order and watch them fall.
The Black Order Core
The core of a competitive Black Order roster starts with Thanos, Corvus Glaive and Proxima Midnight, the Mind Gem and the Reality Gem. This team has two main synergies, Thanos’s Death’s Decree boosting Corvus’s Glaive’s Edge attack and the linked activation between Corvus and Proxima. Two infinity gems are effectively included in the Black Order core, and synergize with their bearer’s strengths. The Mind Gem allows Thanos to be a master of board control, and the Reality Gem makes Corvus a more consistent K.O.ing machine. 15 threat, three characters, and five roster spots later, it starts to become apparent that the Black Order does not play the same game as any other affiliation.


What is Black Orders’ gameplan?
Black Order wants to win by removing the opponent’s key pieces ASAP and controlling what they have left. This means you might fall behind a bit on points in the first two rounds to catch-up with an unexpected quickness in the mid & late game. How exactly do I catch up, you ask? Well, the Black Order has a trick they wear on their leader’s sleeve to do just that.
Thanos’s Death’s Agenda leadership literally rewards you with points for KO’ing enemy models (as long as Thanos stays healthy). These points help you keep pace, catch-up and pull ahead while your opponent’s most important pieces inevitably fall beneath the weight of your boosted and fixed attack dice.
Instead of the more traditional gameplan of racing to 16 from the get-go, you want to limit your opponent’s scoring opportunities and maximize the benefits from your leadership. This does not mean you are not sitting on secures for points and not grabbing extracts. This means you want to deny your opponent from scoring the secures more than you yourself scoring them. You are more focused on setting up models for Corvus to kill while also removing them from secures with Thanos (more on that later). It isn’t attrition first so much as attrition forward.
You can close out games once you have removed enough of your opponent’s models. They can’t score if they’re KO’d.
The fewer points there are to score each round, the fewer points you need to catch-up and the greater the benefit from healthy Thanos’s point generating leadership. To encourage low scoring games, you need to bring low scoring crises.
Crisis Selection
Crisis selection for Black Order is fairly straightforward, pick a slow crisis in order to keep the points per round to a minimum. For that reason, Black Order almost always wants to pick extracts, mainly for Alien Ship and Skrulls.
Extracts
Alien Ship – 20 threat – C shape, Skrulls – 17 threat – C shape
Not only are 20 and 17 good point values for Black Order (more on that in the next chapter), they also bring an extract to the table that might not get picked up during the first few rounds, requires a roll that favors Corvus with the Reality Gem, inherently counters a lot of the meta-dominating grab and run extract plays, and, if the opponent does somehow manage to find the extract, makes it so you only need to hunt down one model, which has so kindly been placed near the middle of the board by your opponent.


With these first two extracts as our base, we need a third. This third extract could be more of the same, a flex option to fill a perceived gap, or allow a line of play not offered by the Skrull or Alien ship. For your flex option, there are tons of viable picks each with their own merits and flaws. This third extract is very much up to you and how you want to play.
Senators – 14 threat – C shape
Senators shares many characteristics with Alien Ship and Skrulls; it is a single, slow-scoring extract crisis with a C shape that inhibits your opponent from running away with the extract. Unlike Alien Ship and Skrulls, the Reality Gem does not make Corvus more likely to find the extract. Also, the extract only needs to be checked a maximum of three times, once per safe house. This can make the crisis faster than Alien Ships and Skrulls. Once found, the Senator is even more of a liability than the core or the skrull, since the bearer suffers negative one dice on defense and dodge rolls and has their speed reduced to S. This cuts both ways, since it makes any character with the extract, whether friend or foe, easier to kill.14 threat is a mixed bag for Black Order. It can be good, because your opponent will have fewer models for you to K.O., making your alpha strike stronger. However, 14 threat is one less than the 15 needed to run the Black Order core. There are several options for dealing with this (more on that in the next chapter), but they are generally considered much weaker than the 15 point core.
Herbs – 15 threat – A shape
While this extract gives a lot of VPs (four) should a player be able to score it, it is the most difficult objective to score in the game. This is especially true for your opponent if you have Thanos with the Mind Gem, which allows him to move your opponent’s herb carrier into a place where they are inconsequential or into the loving arms of Corvus. The herb carrier rolls additional attack dice, is limited to a single move action, and gains immunity to stagger and slow. Since our Herb is so close to the opponent’s vessel, it can be picked up as needed if the threat of an opponent’s score becomes material. Also, 15 is a point value BO likes (more on that in the next chapter). Recently, however, more and more lists, such as Defenders with mystic portals and Criminal Syndicate, have strong plays on Herbs, along with any roster packing some combination of Toad, Lockjaw, and Medusa. This extract was an early staple for the affiliation, but is not as consistently good for us as it used to be.
Montessi – 17 threat – E shape
Montessi is appealing for Black Order, since it has a preferred crisis value, is E shaped, has a low VP total, and gives a slight edge to the priority player. Thanos with the Mind and Time Gems is a go-to at 17 threat. With this setup, he can easily grab the center spell book and position for a powerful turn 2, retreat to scoring a home point, or simply back to relative safety. Montessi can be non ideal against squads with a safe, midline extract play, since you’re forced to concede the center point or activate Thanos first in round one. Activating Thanos so early means that you cannot reliably take advantage of his powerful control options, which can be a lot to give up for a single VP. While the Beams granted to the holder of a spell book token shouldn’t be too much of a problem with our low model count and with some good positioning, they do, however, become another variable to track.
Cubes – 17 threat – F shape
Similar to Montessi, Thanos can activate early to generate an extract advantage on Cubes. Unlike Montessi, Cubes is a very fast objective, with five total points in play. In this case, a Time and Mind wielding Thanos can grab three cubes on turn one, but this play is map and priority dependent. This leads to the same issues associated with Montessi. Cube damage isn’t prevented or reduced by BO reduction. This makes Thanos effectively a five health model if running this type of play. The damage can be somewhat mitigated using healing tactics cards, but that costs at least one tactics card slot (more on that in Chapter 3). Cubes opens up a line of play that our base extracts don’t enable, but requires us to commit additional resources. This investment, however, allows us to run a fast scoring extract option, which could be used to fight fire with fire on a fast scoring secure with the hope that our bonus VPs can push us over the top. That said, the health cost of playing Cubes can make Thanos vulnerable to all-ins from opponents with mobility or ways to control the big man around the map. The damage on Thanos can also limit how aggressively we’re able to use him as a control piece, which, in turn, can limit his participation in the aforementioned Black Order game plan.
Panic – 19 threat – B shape
Thanos with the Time Gem is, debatably, the best piece for aggressive Panic plays, since he can double move to pick up one of the citizens on your opponent’s side of the table and still move medium back to a safer position. This works particularly well at 19 threat, since a two point character can pick up the other citizen on Thanos’ side of the table and Corvus and Proxima can punish your opponent for trying to take your citizen on the side opposite Thanos. This play is not as safe as it was before the Hired Muscle ban, and, with the addition of Panic to the restricted list, comes with added cost and a higher commitment in roster building. This added cost can be hard to justify, since you cannot guarantee that you will be able to pick extracts, let alone this particular extract. While costly, Panic can be a dynamic pick for Black Order. You’re able to leverage evacuation and leadership VPs into large, mid-round point swings.
Hammers – 18 threat – D shape
While it might be fun to shout “It’s Hammer time!” when selecting this crisis, Hammers may not be the best choice for Black Order. At 18 threat it is difficult to play Thanos with the Mind and Time Gems. Without a Time bearing Thanos, it can be difficult for Black Order to gain an early advantage on this crisis. Additionally, Corvus can often one-shot models already, so the hammers are often unneeded on him. The hammers also limit the use of key tactics cards, such as Mothership (more on that tactics card in Chapters 3 and 5). One of Black Order’s strengths is being relatively tanky. Giving your opponents hammers can make this tankiness easier to overcome. All this combined means that your opponent can often benefit more from Hammers than you.
While Black Order can make a lot of extracts work (as detailed above), there is one extract that you should not consider for your flex spot.

Spider Infected – 17 threat – F shape
You probably have three models, maybe four at 17. Giving your opponent the chance to control the movement of your high-threat models makes you use some of your precious, limited actions moving back into good positions. Additionally, the randomness of the displacements makes advanced planning difficult. Never pick this … never.
Secures
Now, with extracts covered, we must also prepare for those days when neither Lady Luck nor Lady Death is with us, so we have the misfortune to not win priority against a clever opponent who denies us access to our preferred extracts. In this case, which secures should you bring to mitigate your opponent’s (probably fast scoring) extract?
Well, the most obvious secure for Black Order to bring is Demons Downtown.
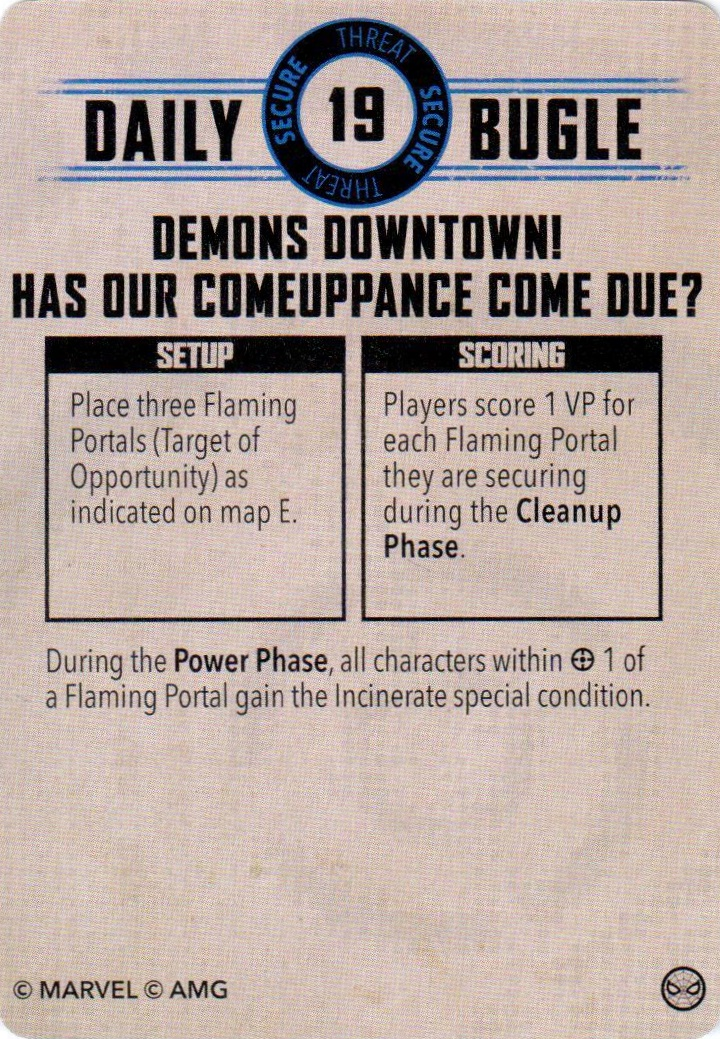
Demons Downtown – 19 threat – E shape
What makes Demons Downtown obvious, you ask? Demons plays directly into Black Order’s attrition forward gameplan. It is low scoring, only giving three VPs at maximum. The E shape means that our opponents will need to have a lot of models on the centerline of the board, making it costly for our opponent to run away from Corvus, our death machine in plastic model form. The E shape also allows us to have our characters close together, enabling them to support one another, maximizing the synergy of the Black Order squad. Additionally, Demons gives out incinerates like candy, increasing Black Order’s ability to Daze and K.O. the opponent’s characters. Finally, Demons is a 19 point secure, which is a great point level for Black Order (more on that in the next chapter).If you draw this, there’s a good chance you’re playing it.
What else does Black Order like? Some D shapes!
But I thought BO wasn’t good on D shapes? Ds force teams to spread out and create one-on-one match-ups. Thanos at 7-9 threat is bigger than anything else on the board. Corvus and Proxima are effectively an 8 point character with 4 actions if you play them in range for the husband and wife combo. If you park Proxima or a 2 cost on your back secure with an extract and have Thanos and Corvus go to one flank, you will eventually win that flank and score VP’s off those kills. Now your opponent has a decision to make: (1) will I keep the rest of my models on the other 2 secures to keep scoring points and watch them get pulled in one by one by Thanos and KO’d by Corvus and slowly lose from there or (2) do I leave my 2 secures and bring the fight to Black Order. If the opponent did not bring the fight to you from turn 1, one of these last scenario’s is likely to happen. This means that you have probably won the game from there on out.
Looking at the options for the D shaped secures, we have:
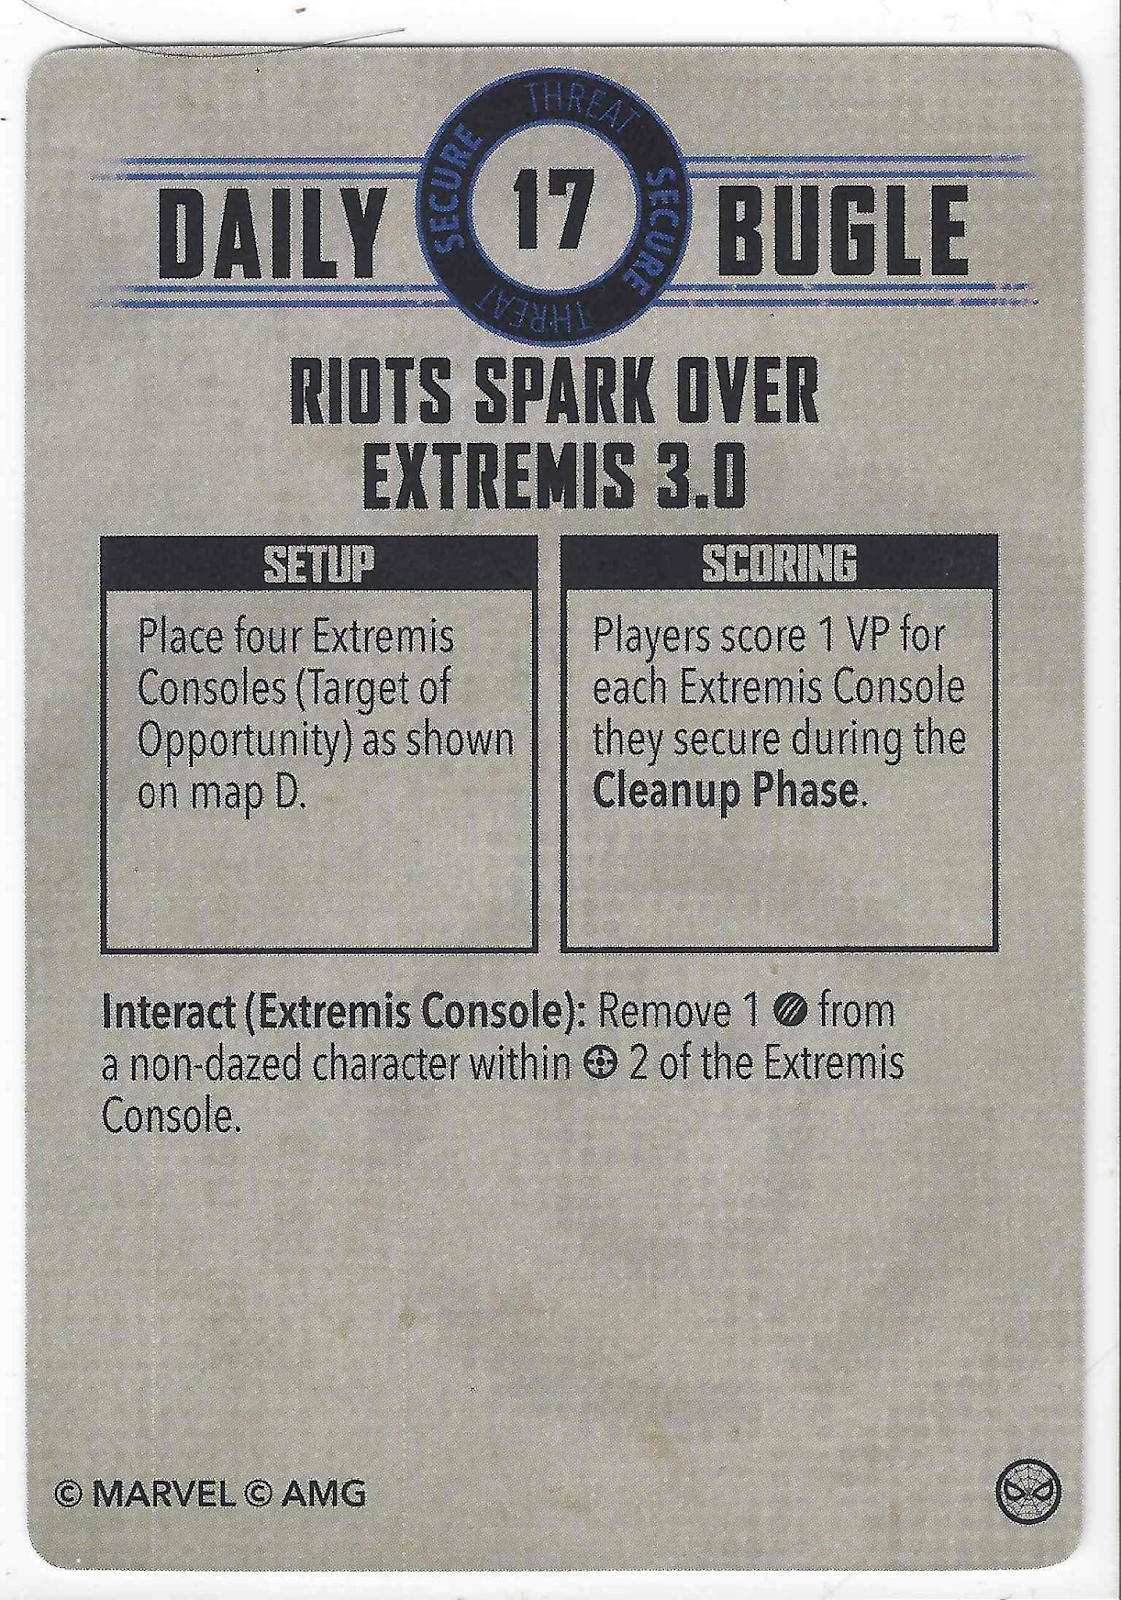
Extremis Consoles – 17 threat – D shape
When Black Order heals from Extremis, it is almost like getting two health, due to the invulnerability on Corvus and Proxima and the damage negation on Thanos. In most cases, you’re one-rounding your opponent’s characters, so the healing isn’t really a drawback.
Cosmic Invasion – 16 threat – D shape
16 threat isn’t a favorite, but isn’t terrible either, so long as you’re prepared for it (more on that in the next chapter). Cosmic Invasion isn’t as advantaged for Black Order as Extremis. The displacement effect isn’t great and can’t be counted on, but can be used to your advantage with proper positioning of your models in combination with Thanos repositioning opposing models. 90% of luck is being prepared (unless we’re talking about dice, but that’s a different discussion).
Spider Portals – 18 threat – D shape
Spider Portals is a flip secure. This mechanic means it’s not as beneficial to Black Order as the other D shape secures.
Your first instinct might be to go for a flip secure with Black Order. But they are actually kind of bad for Black Order. Flip secures not working for us is kind of counter-intuitive, you’d think a scenario that was flip and forget, and allowed you to keep pushing into the opponent would be great!
It isn’t.
It means that your opponent can use their character count to their advantage. This makes it harder for you to flip secures they’re contesting, requires too much movement when we want to be fighting, and can allow too many of the opponent’s models into the fray at the same time. It also stops the game plan of you contesting on their secures or moving models off secures with the mind gem and Thanos’s portals. If they need to sit on secures to score, we know where their models will end up and we can set up a better following turn because of it while also denying points. At the time of writing, there are two other flip secures.
Mutant Madman – 18 threat – B shape
Mutant Madman is B shaped, which is fine (fine, not great, just fine). The shape means we’re thin on both sides. The trap mechanic isn’t terrible for us, but, again, not a real advantage either.
Meteors – 17 threat – C shape
Meteors is the right shape and the right points. The Reality Gem even gives some advantage when rolling to control the secures. Surely this one is worthy of inclusion, right? If you’re determined to include a flip secure in your arsenal, this is probably the one to include. If we’re leaning on Corvus, our token Reality Gem bearer, to flip these, we’re asking Corvus to work even harder than usual and telegraphing his positioning. A clever opponent will also make sure they can always flip one or two bombs with their higher model count after all our activations are done. Also, keep in mind our damage reduction abilities don’t work on the crisis damage. On top of this, we’re worse on this crisis than Asgard.
To get back on point, we know that we are taking Demons Downtown & Extremis as our base for secures. We’ve also touched on Cosmic Invasion as a possible inclusion if you want to be able to force a D secure layout. The ability to force a certain layout gives you consistency and shouldn’t be overlooked, but there are other viable options for your third secure.
Gamma Waves – 15 threat – E shape
Gamma, like Demons, is an E shape secure, which is great for Black Order (as discussed above). Like Demons, Gamma has a point level that Black Order likes. Unlike Demons, however, Gamma is a fast scoring secure. Gamma also can benefit the player without priority, which is straying from the game plan. This contrasts with Black Order wanting to maintain priority as much as they can (more on that in Chapter 5). This can be a significant issue against things like control-based lists and Criminal Syndicate with Kingpin’s leadership on Gamma. These types of opponents can use last activation to gain early VP leads, which Black Order squads can struggle to overcome. Against non-control lists, and lists without Kingpin’s leadership, however, creating a fighting heavy game on the centerline of the table at a good point level can make this secure quite good for Black Order. As previously discussed with Cosmic Invasion, including Gamma and Demons grants consistent access to the E shape.
Infinity Formula – 17 threat – B shape
Infinity Formula, like Mutant Madman, is B shaped, which can split up your already small roster. Unlike Mutant Madmen, however, Infinity Formula is a power generating secure, and not a flip secure that takes power to try and control. This makes Infinity Formula better than Mutant Madmen for Black Order, but it does not make it an ideal secure. The strategy for this secure is to grab some extracts and go all in on one flank, using K.O. VPs to gain a lead.
Fisk and Terrigen Clouds; 16 and 20 threat – Split C shape
Fisk and Terrigen Clouds are, currently, the only split C shaped crises. This means that there will be two secures on the middle line of the board, one on the left and one on the right. This split C layout is similar to the B shape (fine, not great, just fine). Another key aspect of these two specific secures is that if your opponent controls them you get to move them, and possibly do damage to your opponent’s characters that were controlling them. The Fisk secure gives out stun. Thanos is immune to stun, but Corvus hates it. Terrigen gives out poison, which all our characters hate. However, Fisk is 16 threat (fine, if you’re prepared for it), while Terrigen Clouds is 20 threat (great!). For both of these secures, the strategy to win is similar to the one used on Infinity Formula, grab some extracts and go all in on one flank. You will probably win that flank and score some K.O. VPs along the way. This should tie you, or, at the very least, keep you and your opponent’s scores close. Once you have cleared your flank you can leave Proxima behind and start using Thanos to tractor beam in activated models from the other secure, which you have moved a bit closer over the last few rounds. Those enemy models that have been brought into the loving arms of Corvus will likely be already damaged from the secure, making Corvus’s job easier. With the scores being tied, or at least close, each round, the VPs from the K.O.s will edge out a win. With all of that in mind, either of these two crises are viable picks for Black Order, but they also have significant drawbacks.
Now that we have an idea of which crises to bring, it is time to flesh out our roster with some characters. So, stay tuned for the next exciting chapter of Oh Snap!: The Thanos Thesis.