


Hey guys! UtilityCookie here and back with another affiliation series, this time: X-Force!
In this series I will try to guide you through my thought process in building a hybrid X-Force roster. This series will not focus on X-force alone but will branch out a bit into another affiliation to help the X-force core on scenario’s where spread out play is more beneficial on the crisis combination.
So I ask you, do you like to change the odds in your favour? Want to keep rerolling dice till eternity? Do you like to threaten your opponent on the first activation of turn 1? Then X-Force is just the affiliation for you!
Selecting Your 10 Characters for a X-Force Roster
As mentioned in the previous article, the roster we are building uses X-Force as a base for the more ”narrow” or ”fighty” crisis combinations (Think central objectives and slow scoring), and we will be bringing in another affiliation that can make use of some of the same characters as X-Force does while covering the more spread out and faster scoring scenario’s. With a leader that can incinerate, tactics cards that enable two attacks from Cable on round 1 and great damage output from Deadpool and Domino it is clear X-Force are looking to bring the fight to the opponent with guns blazin’. So lets start by looking at the core set of characters you are always bringing.
The Core
Cable
Your leader, your anchor, it’s your boy Cable. Not widely accepted as a decent model if I listen to what others in the community are saying. I get that, if you compare him to someone like MODOK, although I do not think we should ever compare models to the likes of MODOK. So what does Cable do for X-Force?
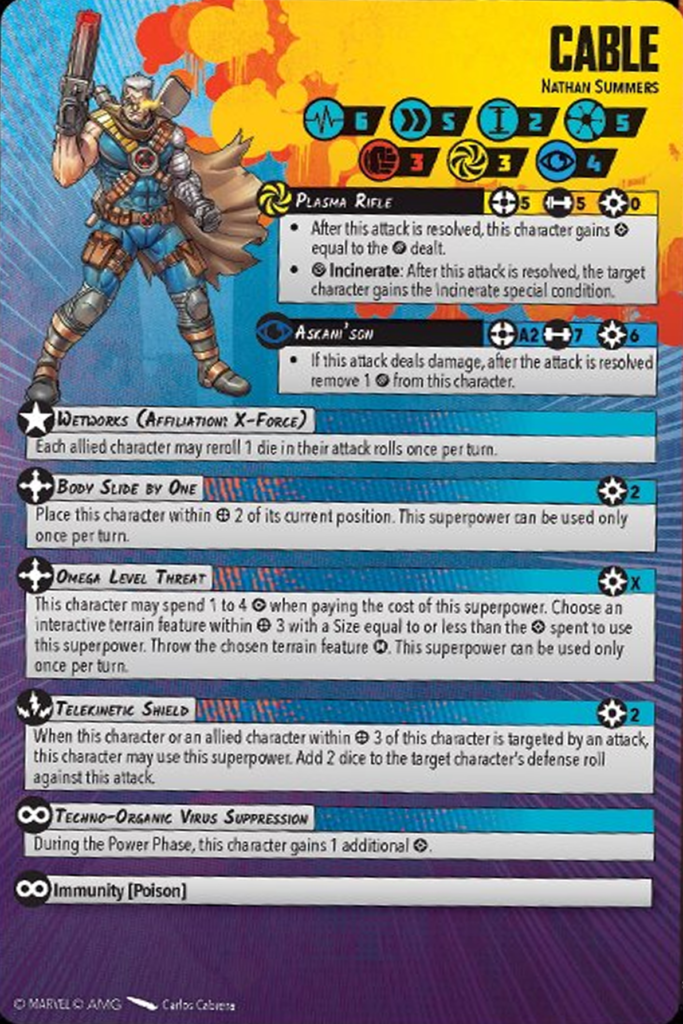
Cable has some pretty impressive board presence between his range 5 Plasma rifle and his Body Slide by One which he can use every round because of his extra power gain. The incinerate is a nice bonus for the type of list we are building (hint: It has lots of guns). His leadership will help your team with a reroll when you want to crank that extra damage in on a low defense roll of your opponent. Cable also brings a throw that you can be flexible in, the power cost is equal to the size of the terrain piece that is being thrown, up to Size 4. Within 3 and throwing M is pretty solid. Lastly he can boost the defense dice of allies the same way Dr. Strange can. His spender attack does not come up often but can be pretty impactful when it does, a mystic A2 attack that heals Cable is pretty nice on those narrow scenario’s we are going to use X-Force for. On his injured side the attack also has the possibility to stagger.
The way you should use Cable is to have him sit in the center or between 2 secures, double attacking each round if possible, between his Body Slide by One and his range 5 attacks this should be possible each activation. Any extra power can then be used on a throw, some defense buffs or paying for tactics cards.
Domino
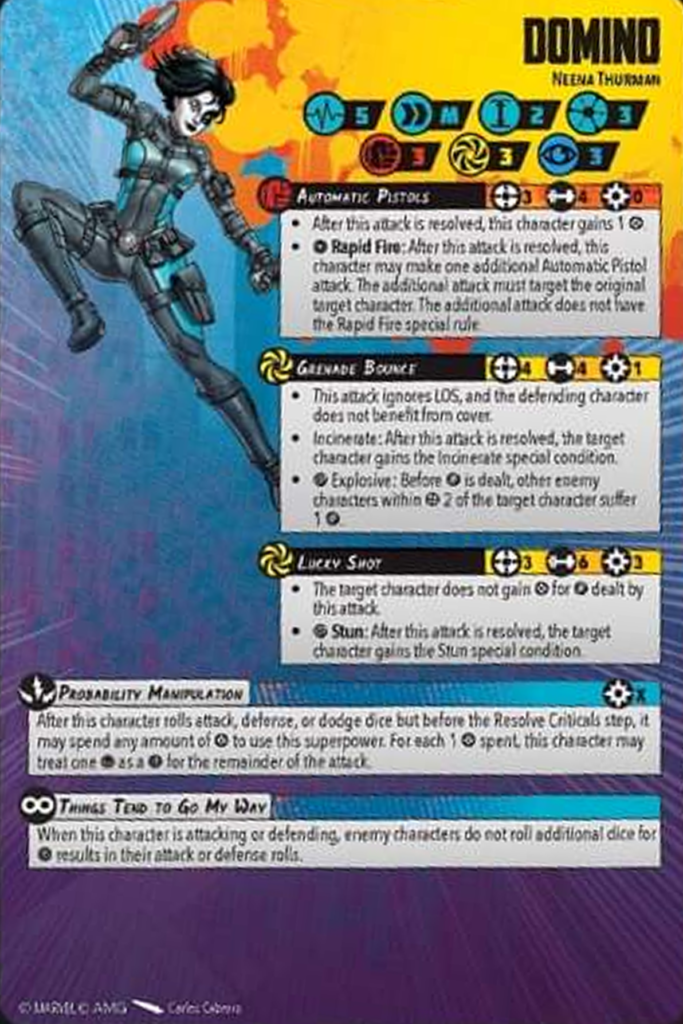
One of the two main damage dealers of the list. She has the option to auto-incinerate at a respectable range 4 for 1 power. Not always the best move to use round 1 but it is nice to have. Her Automatic pistols attack is pretty standard, the rapid fire only triggers on a hit so that is something to keep in mind. What makes her so good in dealing damage is the Probability manipulation superpower, you can pay x power to let an X amount of skulls count as crits, this is done before criticals are exploded so you can roll these skulls in as extra crits. Another trick domino can do with her extra power is pay for more than you have rolled, any new skulls will then also count as successes. This can be used on attack rolls, defense rolls and dodge rolls.
Lastly opponents do not roll additional dice for critical results when attacking or defending against her. This will stop crazy spikes happening which helps in her damage output and with her survivability.
Because her pistol attack generates an auto power and she can make up to four of those attacks she will always have power floating around for tactics cards or extra skull crits wich offers some nice flexibility.
Deadpool


Deadpool is your other main damage dealer, like Domino he has access to an attack that can roll into more attacks, Deadpool has the potential to make up to 6 Bang attacks per activation. Another nice bonus is that his version reaches up to range 4 but unlike domino it does not grant power. Deadpool brings a reroll on attack and on defense which combined with the leadership and his trusted dance partner (who will cover after him) can lead to some big damaging activations from him.
Deadpool is immune to some of the movement effects in the game like webpulls from Web warriors and the movement effects from Enchantress/Sinister and M.O.D.O.K. .
On his injured side he gains access to a new attack called Maximum Effort! This is another great attack on a narrow scenario. On a Wild, Deadpool can move short and will deal 1 damage to every character within 2 (including himself) and gains a power for each character damaged this way. You will only need a few characters in range to be able to do this attack twice with the power refund. With his healing factor of 2 you will heal the damage right back up.
Zemo
Our team mascot, our motivator and motivational speaker, Zemo.
Not affiliated but a vital part of our X-Force strategy.
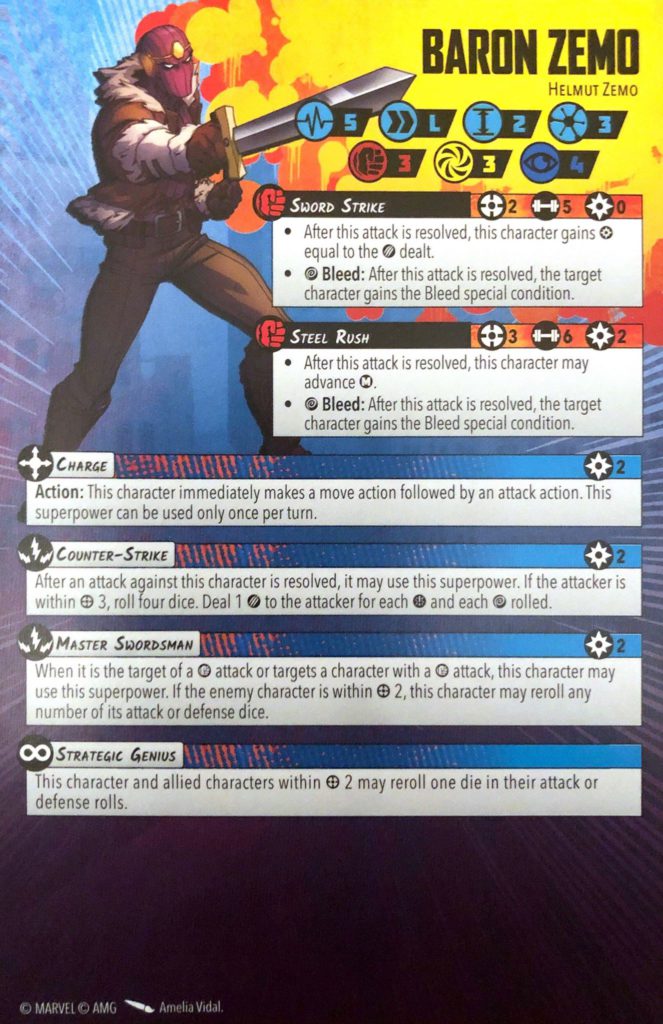
So we are playing on narrow scenario’s, everyone is close together, we are rocking with some dice fixing already between Domino and Deadpool. Zemo is here to help us out even more and is our last piece in our fortress of death. The extra reroll he brings really cranks up survivability and our damage output. Suddenly Deadpool has 2 rerolls on each Bang attack and defense roll, Domino already had dice fixing through skulls=crits and cable now also has a nice reroll. The leadership on top is icing on the cake.
Zemo is also the one that can rush in and out of the fortress to grab a dropped extract or interact with a secure. A cheap solid piece that really brings our strategy together.
Bringing the core together
So we have two models that can crank out more than 2 attacks per activation, we can lower the defenses of our opponent and we have tons of rerolls at our disposal to capitalize when our opponents defense dice fail him/her. A typical round one set up can look like this:
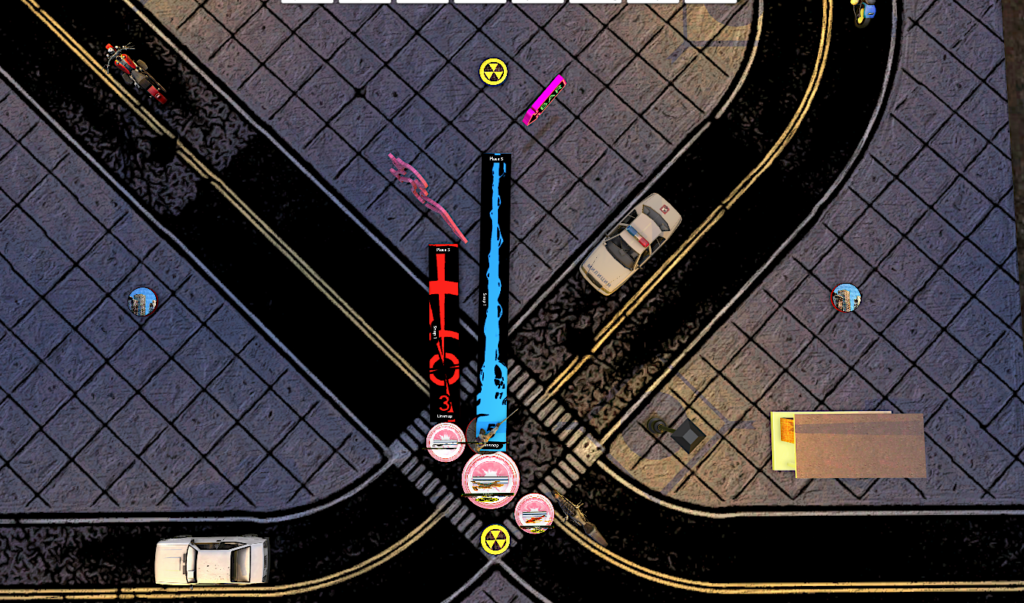
Here Cable used Cat and mouse and is threatening quite far up the board. If he were to activate and use his Body Slide by One he can reach out the anywhere within 1 of either the back gamma shelter or one of the flank extracts. Double tapping anyone who stands there and fueling him up for the following rounds for his throws or defense buffs. A typical first activation is to park zemo in front of Cable (if he can be safe there), so if Cable decides to activate and Body Slide, he will still benefit from the Zemo reroll. After Zemo has activated you have to react to what your opponent will be doing. It is nice to know that should the opponent move up to within 1 of the central secure, both Domino and Deadpool can hit that model with their pistol or bang attacks after their move. While also benefitting from the Zemo reroll. This will put big pressure onto the opponent from the get go and starts the attrition in your favour. Some opponents will try to stay back, this will lead into a great set up for the tactics card Pretty Sneaky Sis! in round 2.
Adding to the core
Now that we know what our core looks like for the X-force side of the roster we will have to look at some friends to bring along that can help and fit this style of play.
Mystique
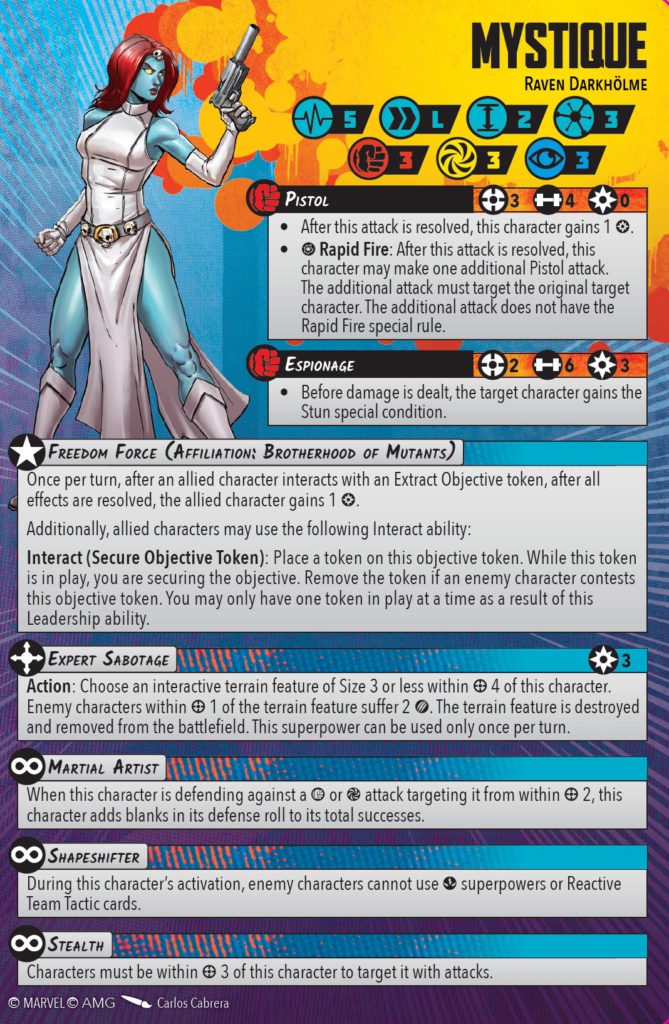
Another model with rapid fire which will benefit from the zemo reroll furthering our ”weight of attacks” gameplan, can blow up terrain so it can’t be thrown at us and rolls blanks on defense for some nice synergy with extra defense dice. Mystique will also deny any defensive tech your opponent might have in the form of Bodyguard or other Superpowers and or tactics card due to her Shapeshifter super power. Stealth will help her stick around longer and is a great target, alongside Deadpool/Domino/Nebula, for a round 2 Blind obsession. More on that in chapter 3: Tactics Cards
Okoye
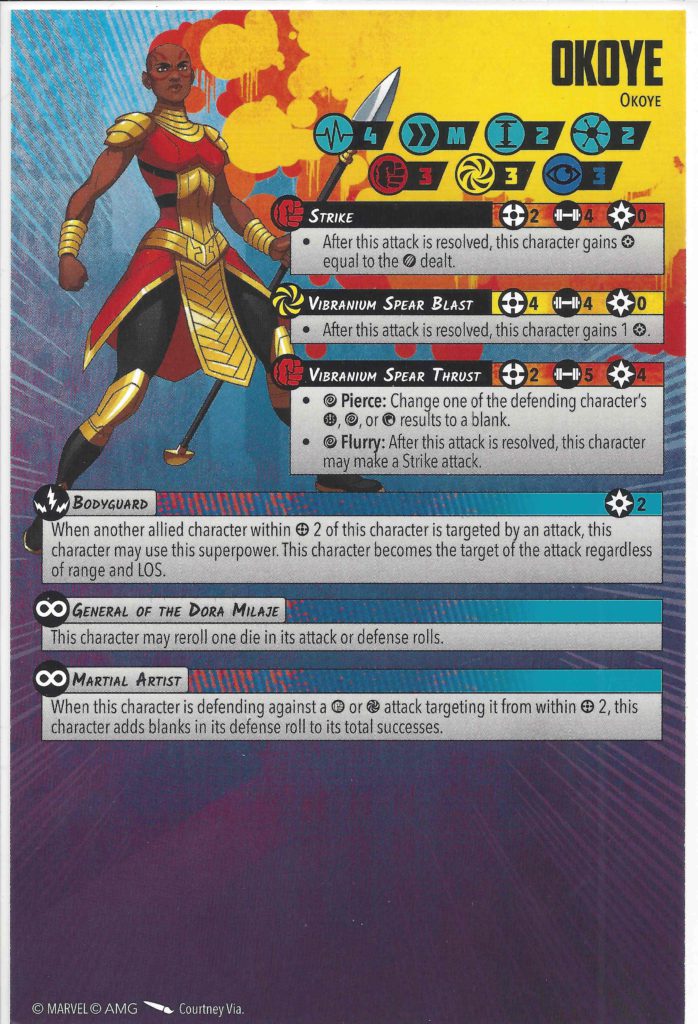
Now that we have some solid three costs it is time to look at some cheaper 2 costs that can pack a punch. The first one that comes to mind is Okoye. She fits perfectly in our Fortress of Death, everyone is already close together for her bodyguard. Like Mystique, rolls blanks on defense which in turn is great when getting boosted by Cable. She also has a reroll on defense and attack dice so the added one from Zemo makes her super consistent. Like the other team members she brings a long ranged attack (range 4) furthering the threat on the board from the get go. Nowhere is safe!
Knowing we will also be bringing in another affiliation for going a bit wider she is the perfect 2 threat character.
The second affiliation
Now that we have some models that work well together with X-force and their gameplan, it is time to take a quick look at what we can add to help us when the scenario is more spread and requires you have more models on the board. Since we are already running Zemo and Mystique the perfect fit is a Sin led Cabal team. This will allow us to put a 6 model team on the table at 16 points and even more at higher point values.
Sin and Crossbones


If we are bringing Sin we are for sure bringing Crossbones (If you have not seen a Sin into crossbones activation under Dark reign you should try it).
Unlike Corvus and Proxima, Crossbones can immediatly activate after Sin but not the other way around. This can lead to some huge swing turns and also requires your opponent to keep track of priority so they do not lose it if they want to keep it. Sin continues the rapid fire theme we were already bringing and is also a prime candidate for Blind Obsession. A 3 threat leader will allow us to go with a pretty big team as you can see further down in this article where we cover example teams.
With a couple of L movers in the list (Sabretooth, Nebula, Mystique, Zemo) we can easily park our models next to activated enemy models to try and trigger the leadership safely.
Sabretooth
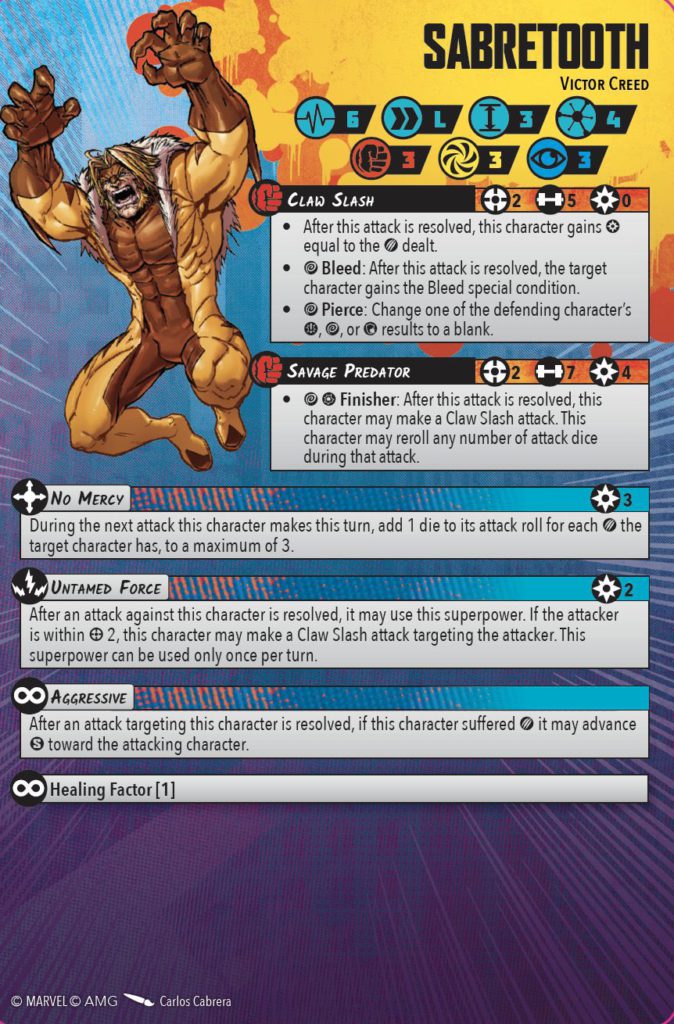
Not the best 4 threat but Sabretooth fits in nicely since he is both Cabal and X-Force affiliated. He will also enable X-Force to build into higher Threat values. In X-force he benefits from a reroll and maybe one more near Zemo, his exceptional healing card can keep him in the fight and is a good pick into certain matchups like for example Black Order. With Sin you get another Long mover to trigger her leadership.
Nebula
Nebula is a solid 2 threat you can bring when you are planning a large team for a certain point value, she is not that important in the VP race for your opponent, but if left unchecked can do some big damage onto the enemy team. Also a good model to put Blind obsession on. A good thing to remember is that she does not work on the secure part of Sin’s leadership, but she does trigger the extract part.
Example teams for different threat values
X-force
14 points
– Cable
– Domino
– Deadpool
– Zemo
15points
– Cable
– Domino
– Deadpool
– Nebula*
– Okoye*
*could play a point down for zemo
16 points
– Cable
– Domino
– Deadpool
– Zemo
– Okoye/Nebula
17 points
– Cable
– Domino
– Deadpool
– Zemo
– Mystique
18 points
– Cable
– Domino
– Deadpool/Mystique
– Zemo
– Sabretooth
19 points
– Cable
– Domino
– Deadpool
– Nebula*
– Okoye*
– Sabretooth
*could play a point down for zemo
20 points
– Cable
– Domino
– Deadpool
– Zemo
– Sabretooth
– Okoye/Nebula
Cabal
14 points
– Sin
– Crossbones
– Zemo
– Mystique
– Okoye/Nebula
15points
– Sin
– Crossbones
– Zemo
– Mystique
– Domino
16 points
– Sin
– Crossbones
– Zemo
– Mystique
– Okoye
– Nebula
17 points
– Sin
– Crossbones
– Zemo
– Mystique
– Domino
– Okoye/Nebula
18 points
– Sin
– Crossbones
– Zemo
– Mystique
– Sabretooth
– Okoye
19 points
– Sin
– Crossbones
– Zemo
– Mystique
– Domino
– Nebula
– Okoye
20 points
– Sin
– Crossbones
– Zemo
– Mystique
– Sabretooth
– Nebula
– Okoye
Now that we know our 10 characters it is time to finish off the roster by selecting your tactics cards. So, stay tuned for the next exciting chapter of X Gon’ Give It to Ya: How to roll dice and win.
And remember you can decide to put together an entirely different team and perform well with it. This guide is merely here to help you on your way and guide you through my thought process.
Missed the first article? You can find it here:
https://acrossthebifrost.com/2021/06/11/x-gon-give-it-to-ya-how-to-roll-dice-and-win-chapter-1-game-plan-and-crisis/