

So, you’ve decided to play Spider-Foes. Maybe it’s the S-Tier model sculpts, maybe it’s the wildly unique characters, and maybe it’s a sense of nostalgia from decades of Spider-Man movies and cartoons. Whatever the reason, if you and the boys are going to find success in Marvel Crisis Protocol, you need to understand how and when to use the affiliation’s hitherto defining Team Tactics Card, Sinister Traps.
What The Card Is And Where You Can Find It
Before we get into our analysis of how best to use Sinister Traps (and when to leave it off the table), let’s recap what exactly the card does and which box you can find it in.
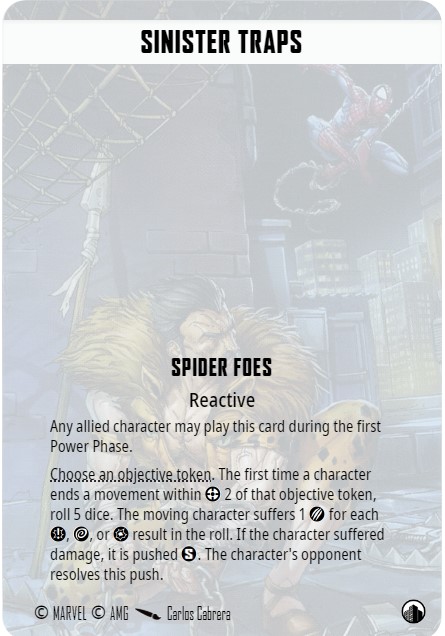
While you can read the full text above, Sinister Traps boils down to this: after deployment and during the first Power Phase, the Spider-Foes player may place a token on any objective (Secure or Extract). The first time any character ends any movement within Range 2 of that crisis token (not the token itself, which is smaller), the Foes player rolls 5 dice. The character who triggered the trap takes one damage for each Hit, Crit, and Wild (no defense roll), and, if damage is dealt, the character’s opposing player resolves the push.
Sinister Traps can be found in CP 58, Kraven & Lizard and likely the upcoming Spider-Foes Affliation Pack (or a friendly printer near you).
When To Use Sinister Traps: A Mental Checklist
There’s no guaranteed, black-and-white checklist of when and where to use Sinister Traps because so little is set in stone in MCP, but there are a few questions you can ask yourself when looking at the crisis combination and the opponent’s roster to help you decide when and where to drop the trap.
Before getting into the specific questions, it’s worthwhile to cover one overarching principle – it’s generally best to ignore the damage part of the card and pretend like Sinister Traps simply allows you to push an enemy model. There are exceptions that we’ll go over in a bit, but starting with this mindset will help you avoid some common misplays that can actually make the card a net negative for the Foes player. That being the case, Sinister Traps is almost always a card you’re going to want to play on a midline extract for reasons we’ll discuss below.
1. How many extracts are on the midline? If it’s only one, will I be taking it with priority?
If you’re playing an Extract like Cubes or Montesi and you have priority, you’re probably going to grab that Extract yourself, and then there’s really no great place to drop the trap. However, on something like Paranoia or Hammers, Traps works very well with priority. See more under the “Using Sinister Traps On Select Crises” header later in this piece.
2. Does my opponent have a model that can bypass or mitigate the strengths of sinister traps?
Movement Superpowers
Some models have superpowers they can use with the power from taking trap damage to reposition themselves and undo the push from Sinister Traps without a move action. An example is Amazing Spider-Man. If the trap does two or more damage, he can the web swing back the middle, grab an extract, and move long away like he would without the trap. Black Cat and a few others can do variations on the same thing, depending on their positioning.
Healing Factor Models
No healing factor models can currently do a safe Extract grab outside of a few affiliations that enable them with TTCs or leaderships, but, particularly on a flank where they won’t get dogpiled, healing factor characters normally don’t mind eating trap damage. They weren’t going to do a safe grab anyway, so keeping them midline isn’t noteworthy, and they can heal some/all of the damage. As such, all you’ve really done is kickstart their power economy. Damage Reduction also fits here to a degree, as they can blunt the damage partially or entirely.
Grunts
Grunt characters can run the grunt up to blow up the trap, and then the parent can freely move up. You’ve got to use your judgment here on if the opponent will want the grunt parent sitting on the midline. Ultron with Age can pretty comfortably sit anywhere, but a character like Fury may be hesitant to hurt his early power economy by sacrificing his grunts and isn’t tanky enough to sit in the middle of the board against a strong punish. He might still do it on a flank.
3. Can I actually punish a model that sets off the trap?
Forcing an otherwise safe grab to sit in the middle is good, but it means little if you have no way to punish that model. If your opponent would otherwise do an Eyes play with Bill but instead takes the damage and sits in the middle, but all you have is Lizard in position to attack, the opponent is going to be pretty happy, and you largely wasted a card. In general, three model archetypes work best for patrolling a trapped objective.
Strong Attrition Pieces
If you’ve taken Traps, it means that your opponent likely doesn’t have a way to set off the trap and still retreat safely. As such, if they want the trapped objective, they’ll remain within one of the midlines Planting a strong attrition piece there can punish that model. There are too many examples of attrition models to name them all, but it obviously needs to be someone who has the range to move once and reach the back of midline. Just understand that it’s unlikely your attrition piece will get the daze, assuming your opponent wasn’t silly enough to run up someone who isn’t tanky, but it does set up a round 2 daze or force your opponent to activate that model first if they have prior. This means you can have other characters in position elsewhere to punish other models who aren’t going first.
Control Models
If you run a character like Venom, Gwen, Thanos, etc, you can position those models to move up, attack once if they need power, and displace the Extract character onto your side of the board for other models to punish. Obviously, this really only works for models with displacement that’s online by default round 1, which isn’t many, or models that only need one power and have decent odds of getting it with an attack. There are some control and attrition combos that are the best of both worlds, like Ultron 2, which can put in a grunt shot, a 6-dice builder, and then can advance the enemy model if he gets just one power from that builder. Note, though, that an opponent can still play Eyes on the Prize to sit range 2 from midline instead of 1, which keeps them safe from most range 3 control superpowers.
Cheap Steals
This is definitely the least consistent option, but it is an option if the setup seems right. Rhino is the easy answer because he’s in-house, and you’re probably taking him in 75-plus percent of games. With his big base he does have the range to move once and attack the back of the midline, and then his attack lets him place within one of the enemy. It’s only a 5 dice attack, but if he does one damage, he has robbery online, and he can force a drop. However, he needs to do two damage on five dice to actually be able to pick the token up, which isn’t a high-odds outcome, assuming a tanky enemy model. However, robbing can still be valuable as you get to place the extract within 2 on your side of the board, forcing the opponent to overextend or letting another one of your models grab it on your next activation. Other steals can work as well, but you’re really going to treat those as set-ups for round 2. Which is still good but less reliable.
Exceptions to the “Use it on an Extract” and “Ignore the Damage” Rules
While it’s almost always better to use Traps on an Extract, sometimes opponents will attempt to deploy very centrally on a spread-out secure to hide which side of the board they play to emphasize. If so, it’s possible that one of the Secures is only reachable by a model double moving. It doesn’t happen often, especially since your opponent can see you have Traps before they deploy, but it does happen, and it is worth keeping an eye out for.
Also, the damage can be worth it on models with strong defensive tech – with a caveat. Models like Steve Rogers, several of the web warriors, Black Panther, and more have defensive tools that make it hard to damage them with attacks. However, Traps is basically a 5-dice attack in which the opponent gets no defensive roll or attack-based defensive tech. It can be worth it to drop an average of 2-3 damage into them to mitigate their tools. However, this is only worth it if you actually think dazing/KOing those models will be important. In a super fast-scoring game, you may not plan on attacking that model more than you have to. So, like everything, it’s contextual. To a degree, this can apply to games in general in which you think attrition will be important. On Demons or Gamma, the damage and push can help provide an early attrition start, given Foes isn’t the hardest-hitting affiliation with raw attacks
Using Sinister Traps On Select Crises
Fear Grips World As “Worthy” Terrorize Cities (Hammers)
If you draw hammers and have priority, it’s a strong move to trap one side hammer and put your safe grab or tanky midline sitter on the other. With a strong punish on the trap side, it’s common to go up 2-1 or 3-1 round one on extracts. If you have your own grunt character, it forces your opponent to either eat the trap with their first activation or risk you setting it off with your grunts and taking it.
Without priority, it can be a dangerous card. A smart opponent will mask which hammer they plan to take first, putting you in a position to go behind on extracts or set off your own trap.
F and E-Shape Extracts (Cubes, Spider-infected, Montesi)
Most of the important information here has been covered in the sections above. With prio, grab the midline. Extract yourself, and don’t take traps. Without it, trap the middle and force damage or displacement.
Paranoia Pummels Populace!
Most of the standard advice applies here, but there are two details to note. First, a midline steal threat like Rhino is particularly effective because of the Bonus VP and how fast this crisis scores. If the steal stops the bonus point, you can go up 4-1 on Extract points. If not, you’re still setting yourself up for a 4-2 lead that can snowball quickly.
Moreover, if there happens to be a secure on the very middle of the board (Scoundrels, Deadly Meteors, Intrusions, etc.), trapping it instead of an extract actually covers both of the two centralized Paranoia tokens. This is only worth doing with a plan. Otherwise, you’re just slowing down scoring for both players.
And that’s it for now! There’s more nuance to specific crisis and character combos that work well with traps, but we’re at quite a high word count already. Hopefully, this article has given you some tools and points to consider to level up your play with Spider-Foes and the Sinister Traps TTC.